I’ve been attracted to building my own river table or epoxy table for years, yet I never actually made one. I understand the concept of a river table, and I’ve worked with smaller epoxy resin projects, but I never managed to get my hands on the kind of slabs I need to make an epoxy river table.
But that didn’t stop me from dreaming and finding inspiration for the perfect table, which will be the centerpiece of my dining area.
What is a River Table?
A river table is a unique piece of furniture made with epoxy resin that incorporates a river-like design element. It is also sometimes referred to as an epoxy table or epoxy river table.
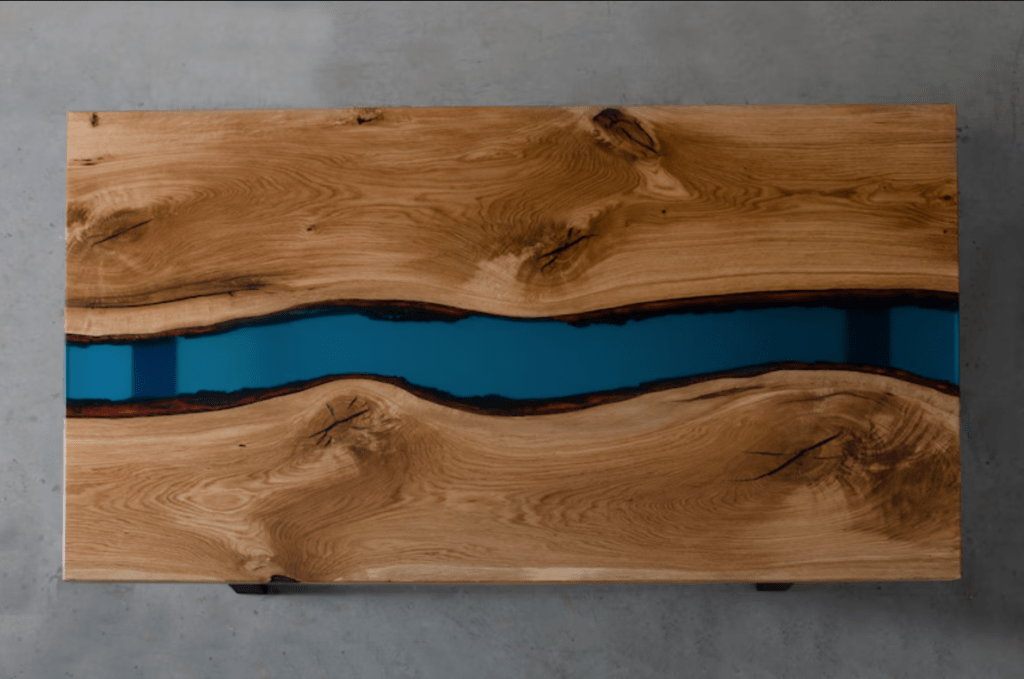
This resin is poured into a groove or cavity created between two pieces of wood, giving the appearance of a flowing river running through the table. The result is a stunning and eye-catching piece of furniture that adds a touch of nature-inspired beauty to any space. Whether you use it as a dining table, coffee table, or desk, a river table is sure to become the focal point of your room.
How Much Do River Tables Cost?
Large epoxy river tables can range from $1,000 to $5,000. The price depends on many different things.
The choice of wood also matters. A black walnut or white oak river table will cost much more due to the popularity and rarity of these woods in large slabs.
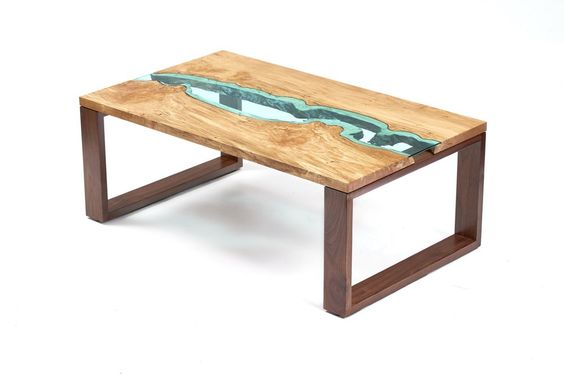
For example, size. A resin river coffee table (example from Greg Klassen) will cost less than a river dining table.
The table base is another factor. You can have your made from aluminum, steel, or the same wood and epoxy slab to create a continuous table leg. Of course, buying river table tops and making the table frame yourself or from another supplier will be cheaper, but you need to know what you’re doing.
Some creators create something truly unique by adding real-world objects to their tables, like the examples here:
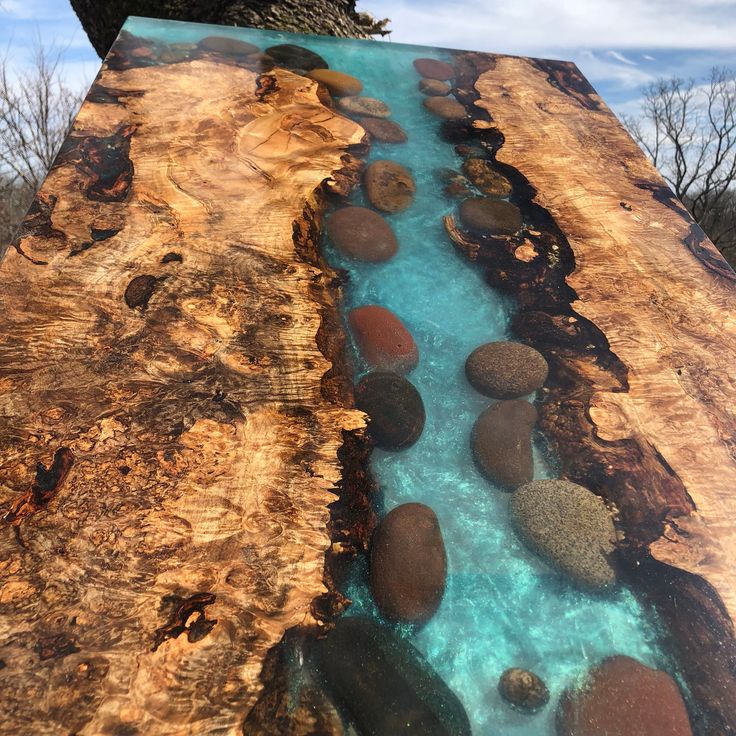
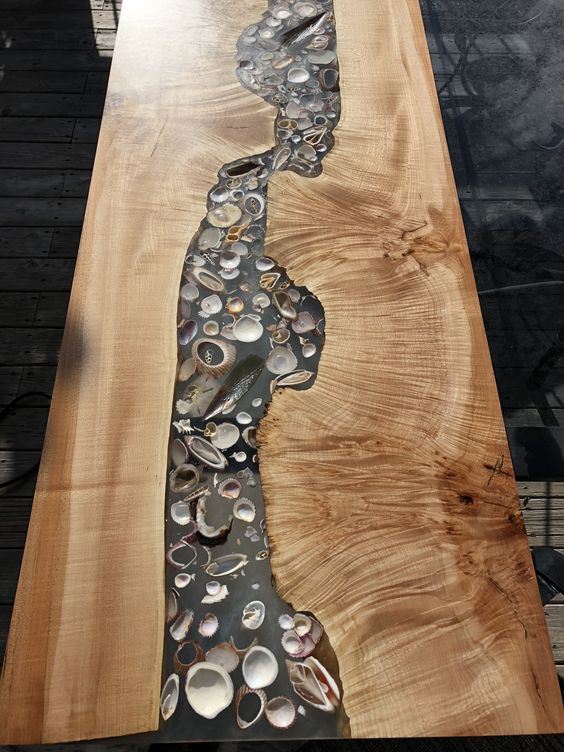
The bottom line: The meticulous and time-consuming craftsmanship involved in shaping the wood, creating the river channel, and pouring and curing the resin justifies the cost, resulting in a unique and durable piece of furniture.
I’ve carefully curated my Pinterest board, which is full of stunning epoxy river tables that I personally like. If you want to learn more about making one, continue reading after the gallery.
My Dream River Table Collection
If you want to see more or get the source of these pictures, view my Pinterest board now, and don’t forget to follow me on Pinterest.
How to Make a River Table
I want to warn you that making these tables is a monumental task, not for a woodworking beginner or DIY enthusiast. Part of the reason I have not been able to make a river table is that I didn’t have the space in my workshop and didn’t take the time to learn how to build a good flattening jig.
Can you build one with wood glue, a Japanese hand saw, good chisels, a small random orbit sander, and your kitchen table? Sure, if your sanity doesn’t matter. There’s a reason these cost so much.
In general, these are the steps to building one:
- Your tools & materials: For the tabletop, you will need two pieces of wood slab (or a single slab cut in the middle), epoxy resin, pigments or dyes for coloring, gloves, mixing containers, stirring sticks, a heat gun or torch for removing air bubbles, sandpaper, and a sealant. You can find some affordable DIY epoxy river table kits on Amazon, but these only cover the resin and pigments. It would help if you already have the tools.
- Prep the wood & mold: Arrange the pieces that will form the tabletop. Make sure the wood is dry and free from defects. You may need to use wood hardener for soft or rotting areas. Wood hardener is like wood stabilization but is much easier to apply to large slabs. You need a mold, which you can buy from Amazon for around $50, or make your own from plywood, fiberglass or other materials.
- Pour & treat the resin: Follow the manufacturer’s instructions for mixing the resin and catalyst. Add pigments or dyes if you want to color the resin. Carefully pour the mixed resin into the river groove. Use a stirring stick to spread it evenly and ensure it fills all the nooks and crannies.
- Remove air bubbles: Gently move a heat gun or torch across the surface of the resin. This will help remove trapped air bubbles and give the resin a smooth finish. Allow the resin to cure according to the manufacturer’s instructions. Depending on the specific resin used, this can take between 24 to 72 hours.
- Flatten, sand, and finish: Once the resin has cured, flatten and sand the table’s surface to smoothen any imperfections. Use progressively finer grits of sandpaper for a polished finish. Then, apply a sealant or oil finish, such as boiled linseed oil or Danish oil, to protect the wood and enhance its natural beauty.
Wait a minute, did I make that sound easy?
It’s simple but not easy (there’s a difference), and you should be prepared for all kinds of unexpected problems. Perhaps you should watch these videos instead:
If you still believe you can make one, these articles may be helpful:
- How to make a wood river table: This is the written version of the video above, which is easier to follow and pick up on the details.
- A complete guide to making wood river tables – Get this book to shorten the learning curve. It has great reviews and covers everything you need to know to get started.
River tables are popular for a reason. They instantly grab attention and add class to your home. Big or small, I hope you get one soon.

![I’ve been attracted to building my own river table or epoxy table for years, yet I never actually made one. I understand the concept of a river table, and I’ve worked with smaller epoxy resin projects, but I never managed to get my hands on the kind of slabs I need to make an epoxy […]
The post 50+ Amazing Epoxy River Table Ideas for Your Inspiration appeared first on Etto Woodworking.](https://i.pinimg.com/564x/91/6d/4d/916d4d322c200ef9aef2fc766c743e30.jpg)
![I’ve been attracted to building my own river table or epoxy table for years, yet I never actually made one. I understand the concept of a river table, and I’ve worked with smaller epoxy resin projects, but I never managed to get my hands on the kind of slabs I need to make an epoxy […]
The post 50+ Amazing Epoxy River Table Ideas for Your Inspiration appeared first on Etto Woodworking.](https://i.pinimg.com/564x/b0/dd/93/b0dd93a0f1e4bbbfba5e7fadf4d224f7.jpg)
![I’ve been attracted to building my own river table or epoxy table for years, yet I never actually made one. I understand the concept of a river table, and I’ve worked with smaller epoxy resin projects, but I never managed to get my hands on the kind of slabs I need to make an epoxy […]
The post 50+ Amazing Epoxy River Table Ideas for Your Inspiration appeared first on Etto Woodworking.](https://i.pinimg.com/564x/32/54/59/3254596e258e954584fccf394273df1a.jpg)
![I’ve been attracted to building my own river table or epoxy table for years, yet I never actually made one. I understand the concept of a river table, and I’ve worked with smaller epoxy resin projects, but I never managed to get my hands on the kind of slabs I need to make an epoxy […]
The post 50+ Amazing Epoxy River Table Ideas for Your Inspiration appeared first on Etto Woodworking.](https://i.pinimg.com/564x/34/79/8f/34798f8ac6705fe1d62b717559d6c351.jpg)
![I’ve been attracted to building my own river table or epoxy table for years, yet I never actually made one. I understand the concept of a river table, and I’ve worked with smaller epoxy resin projects, but I never managed to get my hands on the kind of slabs I need to make an epoxy […]
The post 50+ Amazing Epoxy River Table Ideas for Your Inspiration appeared first on Etto Woodworking.](https://i.pinimg.com/564x/d6/ca/6c/d6ca6c9a45ba5dfb8255e0ec255feeed.jpg)
![I’ve been attracted to building my own river table or epoxy table for years, yet I never actually made one. I understand the concept of a river table, and I’ve worked with smaller epoxy resin projects, but I never managed to get my hands on the kind of slabs I need to make an epoxy […]
The post 50+ Amazing Epoxy River Table Ideas for Your Inspiration appeared first on Etto Woodworking.](https://i.pinimg.com/564x/47/63/24/4763241d7e8504a52d6ac1faba70cabb.jpg)
![I’ve been attracted to building my own river table or epoxy table for years, yet I never actually made one. I understand the concept of a river table, and I’ve worked with smaller epoxy resin projects, but I never managed to get my hands on the kind of slabs I need to make an epoxy […]
The post 50+ Amazing Epoxy River Table Ideas for Your Inspiration appeared first on Etto Woodworking.](https://i.pinimg.com/564x/06/f6/14/06f614a36107d508628d6312d583846b.jpg)
![I’ve been attracted to building my own river table or epoxy table for years, yet I never actually made one. I understand the concept of a river table, and I’ve worked with smaller epoxy resin projects, but I never managed to get my hands on the kind of slabs I need to make an epoxy […]
The post 50+ Amazing Epoxy River Table Ideas for Your Inspiration appeared first on Etto Woodworking.](https://i.pinimg.com/564x/ff/94/d1/ff94d135942b3f58be35712c1fdc0301.jpg)
![I’ve been attracted to building my own river table or epoxy table for years, yet I never actually made one. I understand the concept of a river table, and I’ve worked with smaller epoxy resin projects, but I never managed to get my hands on the kind of slabs I need to make an epoxy […]
The post 50+ Amazing Epoxy River Table Ideas for Your Inspiration appeared first on Etto Woodworking.](https://i.pinimg.com/564x/92/05/fe/9205fea97e72f95f80f7bc375e133d54.jpg)
![I’ve been attracted to building my own river table or epoxy table for years, yet I never actually made one. I understand the concept of a river table, and I’ve worked with smaller epoxy resin projects, but I never managed to get my hands on the kind of slabs I need to make an epoxy […]
The post 50+ Amazing Epoxy River Table Ideas for Your Inspiration appeared first on Etto Woodworking.](https://i.pinimg.com/564x/ed/38/91/ed389144b950fb24f2db5d81bf98e1f7.jpg)
![I’ve been attracted to building my own river table or epoxy table for years, yet I never actually made one. I understand the concept of a river table, and I’ve worked with smaller epoxy resin projects, but I never managed to get my hands on the kind of slabs I need to make an epoxy […]
The post 50+ Amazing Epoxy River Table Ideas for Your Inspiration appeared first on Etto Woodworking.](https://i.pinimg.com/564x/40/24/ca/4024ca917c309c340ac62e4d2110fa85.jpg)
![I’ve been attracted to building my own river table or epoxy table for years, yet I never actually made one. I understand the concept of a river table, and I’ve worked with smaller epoxy resin projects, but I never managed to get my hands on the kind of slabs I need to make an epoxy […]
The post 50+ Amazing Epoxy River Table Ideas for Your Inspiration appeared first on Etto Woodworking.](https://i.pinimg.com/564x/1d/41/c4/1d41c43ee1ac121cfb2fc39c05e160d8.jpg)
![I’ve been attracted to building my own river table or epoxy table for years, yet I never actually made one. I understand the concept of a river table, and I’ve worked with smaller epoxy resin projects, but I never managed to get my hands on the kind of slabs I need to make an epoxy […]
The post 50+ Amazing Epoxy River Table Ideas for Your Inspiration appeared first on Etto Woodworking.](https://i.pinimg.com/564x/9c/41/20/9c4120e03d52c1b66f1787a2dc6bc22e.jpg)
![I’ve been attracted to building my own river table or epoxy table for years, yet I never actually made one. I understand the concept of a river table, and I’ve worked with smaller epoxy resin projects, but I never managed to get my hands on the kind of slabs I need to make an epoxy […]
The post 50+ Amazing Epoxy River Table Ideas for Your Inspiration appeared first on Etto Woodworking.](https://i.pinimg.com/564x/b4/c8/c0/b4c8c0bf880664233d1abf06bba4a900.jpg)
![I’ve been attracted to building my own river table or epoxy table for years, yet I never actually made one. I understand the concept of a river table, and I’ve worked with smaller epoxy resin projects, but I never managed to get my hands on the kind of slabs I need to make an epoxy […]
The post 50+ Amazing Epoxy River Table Ideas for Your Inspiration appeared first on Etto Woodworking.](https://i.pinimg.com/564x/f9/6b/f3/f96bf32a5ca95ad96ac6e55af992ae18.jpg)
![I’ve been attracted to building my own river table or epoxy table for years, yet I never actually made one. I understand the concept of a river table, and I’ve worked with smaller epoxy resin projects, but I never managed to get my hands on the kind of slabs I need to make an epoxy […]
The post 50+ Amazing Epoxy River Table Ideas for Your Inspiration appeared first on Etto Woodworking.](https://i.pinimg.com/564x/2a/89/54/2a8954e7bdaae7fb9751ce0d37a8356b.jpg)
![I’ve been attracted to building my own river table or epoxy table for years, yet I never actually made one. I understand the concept of a river table, and I’ve worked with smaller epoxy resin projects, but I never managed to get my hands on the kind of slabs I need to make an epoxy […]
The post 50+ Amazing Epoxy River Table Ideas for Your Inspiration appeared first on Etto Woodworking.](https://i.pinimg.com/564x/48/81/d6/4881d6767b437d78994a1e883b58e70e.jpg)
![I’ve been attracted to building my own river table or epoxy table for years, yet I never actually made one. I understand the concept of a river table, and I’ve worked with smaller epoxy resin projects, but I never managed to get my hands on the kind of slabs I need to make an epoxy […]
The post 50+ Amazing Epoxy River Table Ideas for Your Inspiration appeared first on Etto Woodworking.](https://i.pinimg.com/564x/d5/9c/b3/d59cb3562509d13744cbe2adee795855.jpg)
![I’ve been attracted to building my own river table or epoxy table for years, yet I never actually made one. I understand the concept of a river table, and I’ve worked with smaller epoxy resin projects, but I never managed to get my hands on the kind of slabs I need to make an epoxy […]
The post 50+ Amazing Epoxy River Table Ideas for Your Inspiration appeared first on Etto Woodworking.](https://i.pinimg.com/564x/0c/a5/3c/0ca53c91d6575dc6beba6f103519c937.jpg)
![I’ve been attracted to building my own river table or epoxy table for years, yet I never actually made one. I understand the concept of a river table, and I’ve worked with smaller epoxy resin projects, but I never managed to get my hands on the kind of slabs I need to make an epoxy […]
The post 50+ Amazing Epoxy River Table Ideas for Your Inspiration appeared first on Etto Woodworking.](https://i.pinimg.com/564x/d8/f4/44/d8f444aa724912dc8e16f036e88bcf56.jpg)
![I’ve been attracted to building my own river table or epoxy table for years, yet I never actually made one. I understand the concept of a river table, and I’ve worked with smaller epoxy resin projects, but I never managed to get my hands on the kind of slabs I need to make an epoxy […]
The post 50+ Amazing Epoxy River Table Ideas for Your Inspiration appeared first on Etto Woodworking.](https://i.pinimg.com/564x/ab/32/d8/ab32d84d6dd96b061c3eefe930637a28.jpg)
![I’ve been attracted to building my own river table or epoxy table for years, yet I never actually made one. I understand the concept of a river table, and I’ve worked with smaller epoxy resin projects, but I never managed to get my hands on the kind of slabs I need to make an epoxy […]
The post 50+ Amazing Epoxy River Table Ideas for Your Inspiration appeared first on Etto Woodworking.](https://i.pinimg.com/564x/27/65/68/27656868036a5566be5bb582f90addec.jpg)
![I’ve been attracted to building my own river table or epoxy table for years, yet I never actually made one. I understand the concept of a river table, and I’ve worked with smaller epoxy resin projects, but I never managed to get my hands on the kind of slabs I need to make an epoxy […]
The post 50+ Amazing Epoxy River Table Ideas for Your Inspiration appeared first on Etto Woodworking.](https://i.pinimg.com/564x/7a/6d/ae/7a6dae5cf49bec8d5618b2a2cbc9110c.jpg)
![I’ve been attracted to building my own river table or epoxy table for years, yet I never actually made one. I understand the concept of a river table, and I’ve worked with smaller epoxy resin projects, but I never managed to get my hands on the kind of slabs I need to make an epoxy […]
The post 50+ Amazing Epoxy River Table Ideas for Your Inspiration appeared first on Etto Woodworking.](https://i.pinimg.com/564x/72/bd/7f/72bd7fb73d085efc7076d62f91f139b6.jpg)
![I’ve been attracted to building my own river table or epoxy table for years, yet I never actually made one. I understand the concept of a river table, and I’ve worked with smaller epoxy resin projects, but I never managed to get my hands on the kind of slabs I need to make an epoxy […]
The post 50+ Amazing Epoxy River Table Ideas for Your Inspiration appeared first on Etto Woodworking.](https://i.pinimg.com/564x/8a/fb/b6/8afbb6d16eee18f094fe782dcdee6e62.jpg)
![I’ve been attracted to building my own river table or epoxy table for years, yet I never actually made one. I understand the concept of a river table, and I’ve worked with smaller epoxy resin projects, but I never managed to get my hands on the kind of slabs I need to make an epoxy […]
The post 50+ Amazing Epoxy River Table Ideas for Your Inspiration appeared first on Etto Woodworking.](https://i.pinimg.com/564x/36/58/b2/3658b287f9ce82aac5f0d61e555a199b.jpg)
![I’ve been attracted to building my own river table or epoxy table for years, yet I never actually made one. I understand the concept of a river table, and I’ve worked with smaller epoxy resin projects, but I never managed to get my hands on the kind of slabs I need to make an epoxy […]
The post 50+ Amazing Epoxy River Table Ideas for Your Inspiration appeared first on Etto Woodworking.](https://i.pinimg.com/564x/66/88/0d/66880d97245568fd7a1865143be2d6eb.jpg)
![I’ve been attracted to building my own river table or epoxy table for years, yet I never actually made one. I understand the concept of a river table, and I’ve worked with smaller epoxy resin projects, but I never managed to get my hands on the kind of slabs I need to make an epoxy […]
The post 50+ Amazing Epoxy River Table Ideas for Your Inspiration appeared first on Etto Woodworking.](https://i.pinimg.com/564x/e5/ea/cc/e5eaccdaeda3446b53832ec45b404550.jpg)
![I’ve been attracted to building my own river table or epoxy table for years, yet I never actually made one. I understand the concept of a river table, and I’ve worked with smaller epoxy resin projects, but I never managed to get my hands on the kind of slabs I need to make an epoxy […]
The post 50+ Amazing Epoxy River Table Ideas for Your Inspiration appeared first on Etto Woodworking.](https://i.pinimg.com/564x/89/52/96/8952961564c0b6859ba9fd4b5d6329b1.jpg)
![I’ve been attracted to building my own river table or epoxy table for years, yet I never actually made one. I understand the concept of a river table, and I’ve worked with smaller epoxy resin projects, but I never managed to get my hands on the kind of slabs I need to make an epoxy […]
The post 50+ Amazing Epoxy River Table Ideas for Your Inspiration appeared first on Etto Woodworking.](https://i.pinimg.com/564x/c4/17/c6/c417c65a4b5b034cba42f44f539a58ba.jpg)
![I’ve been attracted to building my own river table or epoxy table for years, yet I never actually made one. I understand the concept of a river table, and I’ve worked with smaller epoxy resin projects, but I never managed to get my hands on the kind of slabs I need to make an epoxy […]
The post 50+ Amazing Epoxy River Table Ideas for Your Inspiration appeared first on Etto Woodworking.](https://i.pinimg.com/564x/93/6f/b8/936fb8cad6d0086ab03721256aea9691.jpg)
![I’ve been attracted to building my own river table or epoxy table for years, yet I never actually made one. I understand the concept of a river table, and I’ve worked with smaller epoxy resin projects, but I never managed to get my hands on the kind of slabs I need to make an epoxy […]
The post 50+ Amazing Epoxy River Table Ideas for Your Inspiration appeared first on Etto Woodworking.](https://i.pinimg.com/564x/ce/75/57/ce7557500fbb0a11d462b73411871c9a.jpg)
![I’ve been attracted to building my own river table or epoxy table for years, yet I never actually made one. I understand the concept of a river table, and I’ve worked with smaller epoxy resin projects, but I never managed to get my hands on the kind of slabs I need to make an epoxy […]
The post 50+ Amazing Epoxy River Table Ideas for Your Inspiration appeared first on Etto Woodworking.](https://i.pinimg.com/564x/69/03/5e/69035ed6b1d1a3a6496d876bebe059de.jpg)
![I’ve been attracted to building my own river table or epoxy table for years, yet I never actually made one. I understand the concept of a river table, and I’ve worked with smaller epoxy resin projects, but I never managed to get my hands on the kind of slabs I need to make an epoxy […]
The post 50+ Amazing Epoxy River Table Ideas for Your Inspiration appeared first on Etto Woodworking.](https://i.pinimg.com/564x/d1/cb/12/d1cb1259db904481a8a738ae1977a664.jpg)
![I’ve been attracted to building my own river table or epoxy table for years, yet I never actually made one. I understand the concept of a river table, and I’ve worked with smaller epoxy resin projects, but I never managed to get my hands on the kind of slabs I need to make an epoxy […]
The post 50+ Amazing Epoxy River Table Ideas for Your Inspiration appeared first on Etto Woodworking.](https://i.pinimg.com/564x/ae/0b/ad/ae0badb26145d60f3ff8bb914e3ce7a1.jpg)
![I’ve been attracted to building my own river table or epoxy table for years, yet I never actually made one. I understand the concept of a river table, and I’ve worked with smaller epoxy resin projects, but I never managed to get my hands on the kind of slabs I need to make an epoxy […]
The post 50+ Amazing Epoxy River Table Ideas for Your Inspiration appeared first on Etto Woodworking.](https://i.pinimg.com/564x/63/3a/18/633a18b29943979b7497e280d12f79ab.jpg)
![I’ve been attracted to building my own river table or epoxy table for years, yet I never actually made one. I understand the concept of a river table, and I’ve worked with smaller epoxy resin projects, but I never managed to get my hands on the kind of slabs I need to make an epoxy […]
The post 50+ Amazing Epoxy River Table Ideas for Your Inspiration appeared first on Etto Woodworking.](https://i.pinimg.com/564x/04/ad/8b/04ad8b3e82bafdefb5f4aea59976b533.jpg)
![I’ve been attracted to building my own river table or epoxy table for years, yet I never actually made one. I understand the concept of a river table, and I’ve worked with smaller epoxy resin projects, but I never managed to get my hands on the kind of slabs I need to make an epoxy […]
The post 50+ Amazing Epoxy River Table Ideas for Your Inspiration appeared first on Etto Woodworking.](https://i.pinimg.com/564x/e4/ba/fa/e4bafa7b7255c222adae1de12fcd24f7.jpg)
![I’ve been attracted to building my own river table or epoxy table for years, yet I never actually made one. I understand the concept of a river table, and I’ve worked with smaller epoxy resin projects, but I never managed to get my hands on the kind of slabs I need to make an epoxy […]
The post 50+ Amazing Epoxy River Table Ideas for Your Inspiration appeared first on Etto Woodworking.](https://i.pinimg.com/564x/34/ea/34/34ea3417be4625aab5f68a90fe1f496b.jpg)
![I’ve been attracted to building my own river table or epoxy table for years, yet I never actually made one. I understand the concept of a river table, and I’ve worked with smaller epoxy resin projects, but I never managed to get my hands on the kind of slabs I need to make an epoxy […]
The post 50+ Amazing Epoxy River Table Ideas for Your Inspiration appeared first on Etto Woodworking.](https://i.pinimg.com/564x/a9/b0/17/a9b0174598d743432c63466da37f8683.jpg)
![I’ve been attracted to building my own river table or epoxy table for years, yet I never actually made one. I understand the concept of a river table, and I’ve worked with smaller epoxy resin projects, but I never managed to get my hands on the kind of slabs I need to make an epoxy […]
The post 50+ Amazing Epoxy River Table Ideas for Your Inspiration appeared first on Etto Woodworking.](https://i.pinimg.com/564x/29/1e/e4/291ee4c17cfe856ae6c37a282dce2e06.jpg)
![I’ve been attracted to building my own river table or epoxy table for years, yet I never actually made one. I understand the concept of a river table, and I’ve worked with smaller epoxy resin projects, but I never managed to get my hands on the kind of slabs I need to make an epoxy […]
The post 50+ Amazing Epoxy River Table Ideas for Your Inspiration appeared first on Etto Woodworking.](https://i.pinimg.com/564x/a4/a8/54/a4a85494cfec5f0a033f878658b9824a.jpg)
![I’ve been attracted to building my own river table or epoxy table for years, yet I never actually made one. I understand the concept of a river table, and I’ve worked with smaller epoxy resin projects, but I never managed to get my hands on the kind of slabs I need to make an epoxy […]
The post 50+ Amazing Epoxy River Table Ideas for Your Inspiration appeared first on Etto Woodworking.](https://i.pinimg.com/564x/76/b3/cd/76b3cdfb3b13b73d31d54e077e723596.jpg)
![I’ve been attracted to building my own river table or epoxy table for years, yet I never actually made one. I understand the concept of a river table, and I’ve worked with smaller epoxy resin projects, but I never managed to get my hands on the kind of slabs I need to make an epoxy […]
The post 50+ Amazing Epoxy River Table Ideas for Your Inspiration appeared first on Etto Woodworking.](https://i.pinimg.com/564x/f8/4a/03/f84a03773722dc02fcc8731a80d45214.jpg)
![I’ve been attracted to building my own river table or epoxy table for years, yet I never actually made one. I understand the concept of a river table, and I’ve worked with smaller epoxy resin projects, but I never managed to get my hands on the kind of slabs I need to make an epoxy […]
The post 50+ Amazing Epoxy River Table Ideas for Your Inspiration appeared first on Etto Woodworking.](https://i.pinimg.com/564x/00/65/de/0065deea8ad0a29f5f10766f63b53185.jpg)
![I’ve been attracted to building my own river table or epoxy table for years, yet I never actually made one. I understand the concept of a river table, and I’ve worked with smaller epoxy resin projects, but I never managed to get my hands on the kind of slabs I need to make an epoxy […]
The post 50+ Amazing Epoxy River Table Ideas for Your Inspiration appeared first on Etto Woodworking.](https://i.pinimg.com/564x/ae/ea/b1/aeeab1e415b339adce7df449215f1eaa.jpg)
![I’ve been attracted to building my own river table or epoxy table for years, yet I never actually made one. I understand the concept of a river table, and I’ve worked with smaller epoxy resin projects, but I never managed to get my hands on the kind of slabs I need to make an epoxy […]
The post 50+ Amazing Epoxy River Table Ideas for Your Inspiration appeared first on Etto Woodworking.](https://i.pinimg.com/564x/8a/33/3e/8a333e964b820a97523f2c74288ada7a.jpg)
![I’ve been attracted to building my own river table or epoxy table for years, yet I never actually made one. I understand the concept of a river table, and I’ve worked with smaller epoxy resin projects, but I never managed to get my hands on the kind of slabs I need to make an epoxy […]
The post 50+ Amazing Epoxy River Table Ideas for Your Inspiration appeared first on Etto Woodworking.](https://i.pinimg.com/564x/d3/27/42/d32742b8bedf87e77fee168371ede5d4.jpg)
![I’ve been attracted to building my own river table or epoxy table for years, yet I never actually made one. I understand the concept of a river table, and I’ve worked with smaller epoxy resin projects, but I never managed to get my hands on the kind of slabs I need to make an epoxy […]
The post 50+ Amazing Epoxy River Table Ideas for Your Inspiration appeared first on Etto Woodworking.](https://i.pinimg.com/564x/99/6c/94/996c94d97b8b62370b6a83dbf674c330.jpg)
![I’ve been attracted to building my own river table or epoxy table for years, yet I never actually made one. I understand the concept of a river table, and I’ve worked with smaller epoxy resin projects, but I never managed to get my hands on the kind of slabs I need to make an epoxy […]
The post 50+ Amazing Epoxy River Table Ideas for Your Inspiration appeared first on Etto Woodworking.](https://i.pinimg.com/564x/5f/f5/68/5ff568e9ef428921760df4727f10d364.jpg)
